Difference between revisions of "What to Do with Glass"
| Line 4: | Line 4: | ||
=How to Pack Food in Glass= | =How to Pack Food in Glass= | ||
{{:How to Pack Food in Glass}} | {{:How to Pack Food in Glass}} | ||
| + | |||
| + | [[Category:Requested translation to Spanish]] [[Category:Requested translation to French]] | ||
Latest revision as of 17:24, 6 December 2009
Contents
- 1 How to Use Crushed Recycled Glass as Aggregate for Construction
- 2 How to Pack Food in Glass
- 3 Packaging Foods in Glass - Technical Brief
- 3.1 Introduction
- 3.2 Inspection and preparation of containers
- 3.3 Filling
- 3.4 Solids fillers
- 3.5 Liquids fillers
- 3.6 Sealing
- 3.7 Bottles
- 3.8 Jars
- 3.9 Processing
- 3.10 Labelling
- 3.11 Quality control
- 3.12 Collation for transport/distribution
- 3.13 Equipment suppliers
- 3.14 Acknowledgements
- 3.15 Further reading
- 3.16 References
- 3.17 Useful addresses
- 3.18 Categories
How to Use Crushed Recycled Glass as Aggregate for Construction
Developing Specifications for Recycled Glass Aggregate
- Material: Recycled Glass
Crush to sand size which removes sharp edges:
- use as bedding in place of sand
- use as aggregate instead of sand
- add to plaster for decorative shine
Crush to pebble size which removes sharp edges, use as decoration in concrete plaster.
Issue
Glass is a relatively new construction aggregate material. The term "glass aggregate" includes, for this Best Practice, 100% glass, glass-soil, and glass-aggregate mixtures. In general, glass aggregate is durable, strong, easy to place, and easy to compact.
The material can be used for construction applications including general backfill, roadways, utility backfill, drainage medium, and in miscellaneous uses such as landfill cover and underground storage tank backfill.
For each application, the material should be specified based on the cullet content, gradation, debris level, and compaction level. Criteria for developing the specifications for any aggregate rely on a combination of technical data and practical historical experience. Currently, the availability of such criteria for glass aggregate is limited. This lack of information is a barrier to the increased use of the material.
Best Practice
This best practice presents quality control measures applicable for all glass aggregate.
The intent is to define the general parameters that must be considered when developing specifications. A
more detailed development of specifications for glass aggregate in load-supporting (see the Behavior of
Glass Aggregate under Structural Loads) and non-loaded applications (see Glass in Non-Structural
Construction Applications) are presented in separate Best Practices.
Processing and Mixing: Specifications may require that the processed glass be blended with natural
aggregate to a specific percentage. Because blending adds extra costs and can be difficult in the field, the
specifying engineer should give serious consideration to the need for uniform blending. In many drainage or
non-structural applications, it may be permissible to switch between 100% glass and 100% natural aggregate
during the job without sacrificing quality. In structural applications, it may be more important to attain
uniform blending. The blending process should prevent segregation of particles and debris.
Gradation
From an engineering standpoint, it has been shown that 1, 3/4, 1/2, or 1/4-inch minus cullet all
perform well in appropriate applications. Glass of 1/4-inch minus has a grain size close to that of a fine to
coarse sand, whereas glass of 1/4-inch plus is similar to a fine to coarse gravel. In general, cullet particles
over one inch in size become platy in shape and are susceptible to breaking and chipping. A cullet fill
containing greater than 10% of such coarse particles can experience gradation change during transportation
and compaction, and possibly volume reduction upon loading. On the other hand, glass particles smaller
than US No. 200 sieve will have a large surface area and can retain a relatively large quantity of moisture. A
cullet fill containing greater than 10% of such fine particles can become sensitive to moisture content during
compaction, and may be difficult to use during wet weather. The specifying engineer should begin with the
same gradation as is required for natural aggregates in the application, then consider whether the function of
the glass is to replace the natural aggregate with the same gradation or complement it with a gradation that
improves the density of the fill.
Debris Level
Debris may be defined as any materials that may impact the performance of the engineered
fill if present in sufficient quantities. Organic materials may decay and result in volume reduction. Metals, ceramics, and plastic, if present in large enough quantities, can affect the engineering properties. A visual
classification method has been developed for field determination of debris level. See the Visual
Inspectionfor Glass Construction Aggregate Best Practice. The debris level obtained using this visual
procedure is much higher than the debris content measured by weight or volume. This is because paper
residue, which appears to represent 10% by two-dimensional classification, may actually be less than 2% by
volume or weight. Finally, a specification should always indicate that no hazardous materials are allowed.
Compaction
In order to achieve the desired engineering properties in the field, glass aggregate should be
compacted to a specified minimum level in the field. The compaction levels are typically specified using
maximum dry densities determined in the laboratory. For 100% cullet, the compaction data is found using a
Standard Proctor test (ASTM D698). For glass-soil or glass-aggregate mixture, a Modified Proctor test
(ASTM D1557) is typically used. The desired level of compaction is generally 90 to 95% of maximum dry
density. The glass processor should keep data on the dry density of processed glass from that facility, and,
if possible, a lab confirmation should be performed for the specific job.
The level of compaction should be field-verified by in-situ testing. The frequency of testing is typically one
per 2,500 square feet of fill but not less than one per lift of fill. Nuclear densometers are the most
commonly used device for density testing. However, due to the porous and heterogeneous nature of the
material, modifications to the common test procedures should be specified when appropriate. Such
modifications are presented in the following Best Practices:
1) Compaction of Glass Aggregate,
2) Density
Test of Glass Aggregate Using a Nuclear Densometer, and
3) Moisture Content Test of Glass Aggregate
Using a Nuclear Densometer.
Design Considerations
Considerations should be made regarding the exposure of the general public to
cullet fills. Depending on the application, landscaping soil and vegetation, asphalt pavement, or concrete
could be used to cover the cullet fills. Also, considerations should be made regarding cullet fills which are
placed in contact with synthetic liners, geotextile, PVC pipes or pipes with protective coatings.
Implementation: This Best Practice presents a starting point for specifying engineers to begin to
consider the kinds of construction applications in which they will use recycled glass aggregate. Given the
considerations above, engineers should judge their own potential uses based on the properties of glass
aggregate, the availability of properly processed glass, and local economics.
Benefits
The material behaviors of cullet fill and thus the criteria for developing specifications are
similar to those of natural sand and gravel. Dissemination of the best practice information presented here
will help engineers, contractors and permitting authorities to be familiar with cullet fill materials and
ultimately increase their potential use in construction.
Application Sites:
Glass processing facilities, construction sites, and testing laboratories.
References
This article was derived from Best Practices in Glass Recycling, Developing Specifications for Recycled Glass Aggregate. from CWC
Numerous studies and reports have been generated for the use of glass in construction applications. See the
Best Practice Studies of Glass in Construction Applications for descriptions of the primary references.
Shin, C. J., S&EE, Inc., Bellevue, WA Issue Date / Update: November 1996
Contact
For more information about this Best Practice, contact CWC, (206) 443-7746,
e-mail
info@cwc.org.
Related Articles
Categories
How to Pack Food in Glass
Packaging Foods in Glass - Technical Brief
Introduction
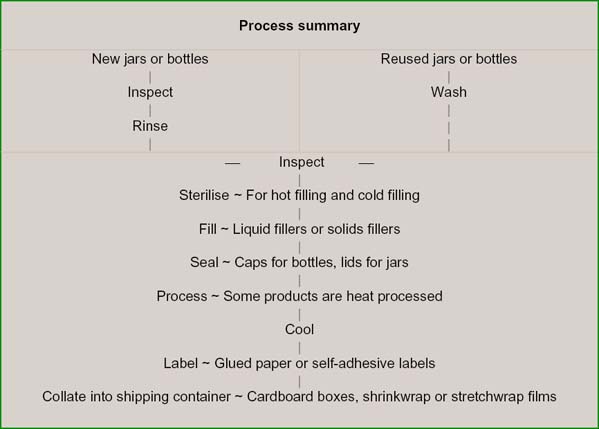
This technical brief is intended to advise small-scale producers on the methods and equipment needed to package foods in glass jars and bottles. For a more detailed account of the types of foods that can be packaged in glass, the properties of glass containers, label design and production and the economic implications of introducing glass packaging the reader is advised to consult 'Appropriate Food Packaging' by P J Fellows and B L Axtell, ILO Technical Memorandum, Published by TOOL Publications, Sarphatistraat 650, 1018 AV Amsterdam, The Netherlands, 1993 (ISBN 90 70857 28 6).
General outline of procedures
Inspection and preparation of containers
All incoming glass containers must be inspected for cracks, chips and small bubbles in the glass. New jars and bottles should be rinsed in clean water, chlorinated if necessary by adding 2-3 drops of household bleach per litre of water.
Second hand bottles must be thoroughly inspected, both by looking for chips etc and also by smelling the containers to make sure that they have not been used for storing kerosene or poisonous chemicals (insecticides etc). All contaminated containers should be removed and not used for foods.
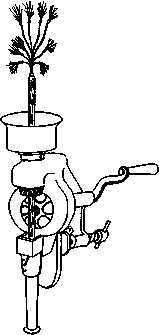
Second hand containers should be soaked in a 1% solution of caustic soda with detergent to remove old labels. The interior should be cleaned with a bottle brush (Figure 1) and then rinsed thoroughly. Rinsing is time consuming and can be speeded up using a bottle rinser (Figure 2).
Many foods that are packaged in glass are then heat processed and for these it is usual to hot-fill the containers (fill at 80°C or above). Glass has to be heated and cooled carefully to avoid the risk of breakage and therefore it is usual to pre-sterilise containers before hot filling. This can be done by placing bottles/jars in a large pan of warm water and heating it to boiling. The containers are boiled for 10 minutes and then removed for immediate filling and sealing.
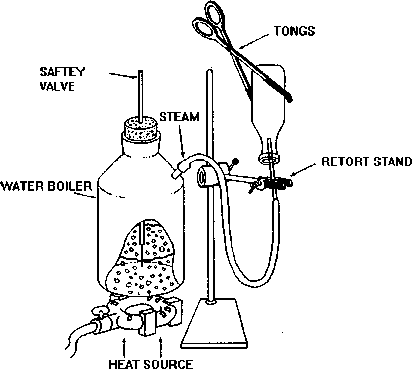
Alternatively a steamer (Figure 3) can be constructed and bottles/jars steamed for 1-2 minutes. This uses less energy and saves considerable amounts of time compared to using boiling water. However, care is needed to make sure that the containers are not heated too quickly, as they will break. Any weak containers will also break at this stage and bottle sterilisation should therefore be carried out away from the food production area to avoid the risk of contamination by broken glass.
Tongs as shown in Figure 3 should be used in all cases when handling hot containers.
For foods that are cold filled and then heat processed it is not necessary to pre-sterilise the container. For cold filled foods that are not subsequently heated it is essential to make sure that the jar or bottle is sterilised by one of these methods to prevent contamination of the product by any micro-organisms on the glass.
Filling
Most foods that are packaged in glass are either liquids, such as drinks and syrups or thicker pastes such as sauces, chutneys etc.
There are basically two types of filling equipment: those used for solid foods and others for liquid foods.
Solids fillers
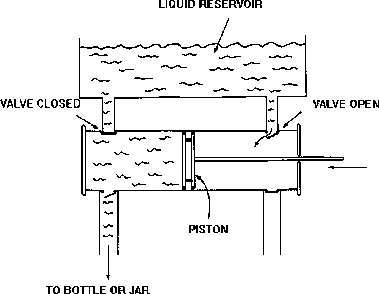
There are few paste filling machines that are cheap enough for small-scale processors but an example of one type (a piston filler) is shown in Figure 4. Most producers fill by hand and although this is slow it can be speeded up by the use of a simple funnel and rod (Figure 5).
In the case of solids such as fruit that is packed in syrup, the solid pieces are first placed in the jar by hand and the liquid is then filled using a liquids filler.
Liquids fillers
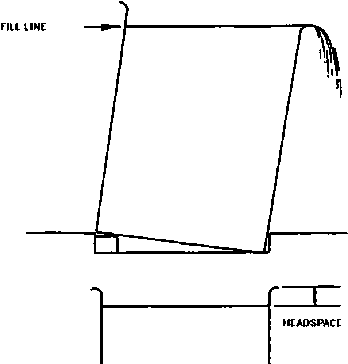
The simplest method is to fill containers from a jug that is calibrated for the correct volume. A funnel can be used to assist filling narrow necked bottles. A simple frame to tilt jars so that the correct filling level is achieved is shown in Figure 6, this will also speed up the filling operation.
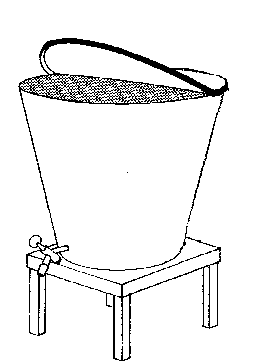
At a larger scale of production, a filler can be made by fixing taps into a 50 litre stainless steel bucket (Figure 7). Food grade plastic is acceptable for cold filling.
However, these methods are relatively slow and therefore only suitable for small production rates (eg up to 1000 packs per day). They also give some variation in the filled volume, even with careful training of the operators.
At higher production rates a piston filler gives a uniform fill-volume and can be adjusted to fill different containers from 25-800 ml. Typical outputs are 15-30 packs per minute.
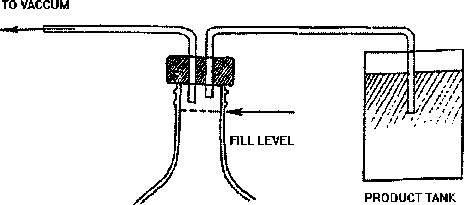
A different approach is to use a vacuum filler. These are available commercially but can also be made locally. The principle of operation is shown in Figure 8. A venturi pump, obtained from a laboratory supplier, is attached to a water tap to create the vacuum. This then sucks liquid from a product tank into the bottle until it fills to a pre-set level.
Sealing
Most caps for bottles and jars have a ring of plastic material (sometimes waxed card or cork) which forms a tight seal against the glass. During hot filling and heat processing this plastic softens and beds itself around the glass to make an hermetic seal. However, before this happens there is a risk that small amounts of air can be sucked into a container and cause contamination of the product. The risk of contamination can be reduced by laying a filled container on its side for about 10 minutes to ensure that the seal is perfectly formed.
Specific types of equipment are used for sealing the different caps that are used for glass containers.
For bottles the main types are:
crown caps
roll-on-pilfer-proof (ROPP) caps
snap-on caps
corks
For jars the main types are:
twist-on-twist-off (TOTO) lids
push on lids
All lids and caps should neither affect the product nor be affected by it and they should seal the container for its expected shelf life. This is usually found by testing trial containers with the product to be packaged to make sure that there is no interaction between the pack and the product. Expert advice should also be sought from the packaging suppliers when selecting the type of closure to be used.
Bottles
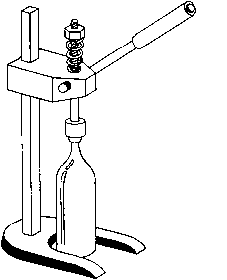
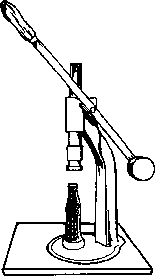
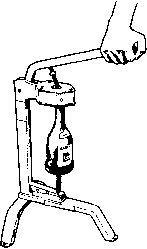
Crown caps are commonly used for beer bottles and fruit juices. Hand-operated equipment is available in a number of sizes from a simple former that is placed over the cap and hit with a mallet, to the hand-held lever type shown in Figure 9 and table mounted model shown in Figure 10.
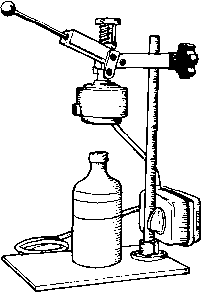
Roll-on-pilfer-proof (ROPP) caps are fitted by placing a blank cap on the bottle and then pressing the metal into the screw thread of the glass. Finally, a ring of perforated metal is formed at the base of the cap that shows evidence of tampering or pilfering. Hand operated ROPP machines can be constructed locally (Figure 11) and small motorised version are available commercially (Figure 12). A simpler cap which does not incorporate the pilferproof feature is known as a 'Roll-on (RO) cap and this can be fitted by similar types of equipment.
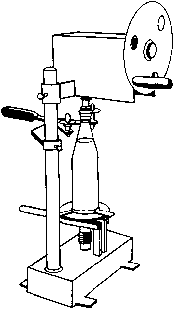
Plastic snap-on caps are fitted over the neck of the bottle and sealed by a capping machine (Figure 13).
Corks are mostly used to seal wine bottles and hand operated corkers which both squeeze the cork and insert it into the bottle are available (Figure 14). Corks are first wetted to make them slip more easily into the bottle and they then expand to give an airtight, waterproof seal. As corks may be contaminated by microorganisms, it is important that the soaking water contains either a few drops of bleach per litre or sodium metabisulphite at approximately one teaspoonful per 5 litres.
Jars
Push-on lids are still used for sealing jars (Figure 15) although these are increasingly being replaced by twist-on-twist-off (TOTO) lids. Small equipment is available for each of these types of closure.
Processing
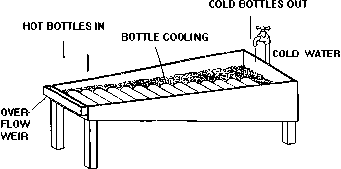
Some products are heat processed after packing into glass containers. They should be heated and cooled gently in order to avoid breaking the glass. One method of controlled cooling of containers after processing is shown in Figure (16). Cold water enters at the deep end of the trough and overflows at the shallow end. Hot bottles are placed in at the shallow end and roll down to the deep end. The temperature is cool at the deep end and gets hotter along the trough, so minimising the shock to the hot containers.
Labelling
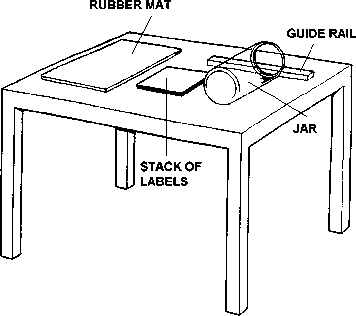
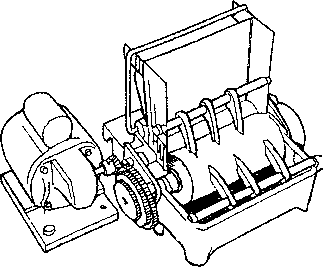
Paper labels are the most common type used on glass containers. They can be plain paper that is glued onto the glass or alternatively self-adhesive types. Figure 17 shows a simple frame which can be used to hold plain labels, wipe glue over top of label in stack, roll jar along guide rail over label, roll and press jar and label into rubber mat. Small labelling machines (Figure 18) can be used to apply strips of glue to labels. A typical powered labeller has an output of about 40 labels per minute.
Water soluble glues such as starch or cellulose based glues are best if containers are returnable, so that labels can be easily removed. However, these glues may loose adhesion in humid climates. Non water-soluble glues, based on plastic polymers, are available and advice on the correct type should be sought from the suppliers.
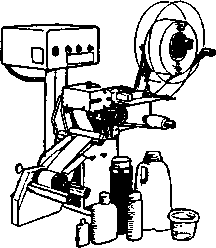
Self-adhesive labels can be bought, fixed to a backing (or 'release') paper in rolls or sheets. They can be applied by hand, by small hand held machines or by powered labellers. The type shown in Figure 19 can apply 30-40 labels per minute.
Quality control
This should be seen as a method of saving money and ensuring good quality products and not as an unnecessary expense. The time and effort put into quality control should therefore be related to the types of problems experienced or expected. For example, glass splinters in a food are very serious and every effort should be made to prevent them, whereas a misaligned label may not look attractive but will not harm the customers.
Faults can be classified as:
Critical likely to harm the customer or operator or make the food unsafe (eg glass splinters)
Major likely to make the package unsuitable for use in the process or result in a serious loss of money to the business (eg non-vertical bottles that would break in a filling machine)
Minor likely to affect the appearance of a pack (eg ink smudges on the label)
Critical faults should always be checked for, whereas others may be examined, if they are causing problems.
For glass containers the critical faults are broken, cracked, or chipped glass, strands of glass stretched across the inside of new packs, or bubbles in the glass that make it very thin in places. Major faults are variations in the size and shape of containers and minor faults include uneven surfaces, off colours in the glass, rough mould lines and faults with the label.
One further quality control measure that is important with glass containers is to check variations in the weight of jars and bottles as these variations will affect the fill-weight. Random samples should be taken from the delivery of containers (eg 1 in 50 containers) and weighed. The heaviest pack should then be used to calculate the final filled weight required.
Quality control needs trained staff, an established procedure and some equipment and facilities. Staff are the most important and all operators should be trained to look out for faults in the product or package. One staff member should have responsibility for checking the packaging.
All glass jars and bottles should be checked for critical faults and if second-hand, checked for contamination before washing. Other quality control checks include:
- the filled weight (to ensure that the net weight is the same as that declared on the label)
- the appearance of the pack
- a proper seal formed by the cap
- the presence and position of the correct label.
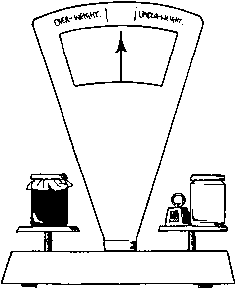
Filled weight can be checked using a scale that has the package plus a known weight on one side and samples of filled product placed on the other side (Figure 20). The number of samples required to be checked depends on the amount of food produced and the method of filling. In general, hand filling is more variable than machines and therefore more samples are required. As a rough guide, one in every twenty packs should be checked.
Collation for transport/distribution
Once the containers have been filled, sealed and labelled they are grouped together to make transport and handling easier. Cardboard boxes are most commonly used and these can be bought or made up on site. A paper label can be used to cover existing printing on reused boxes and also advertise the product during distribution.
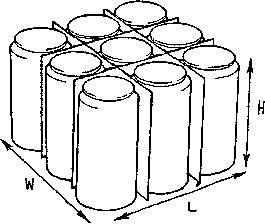
The required size of a box can be found by placing together the containers to be packed, together with dividers, and measuring the size to find the minimum internal dimensions (see Figure 21).
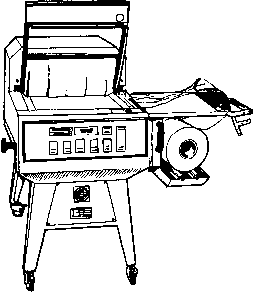
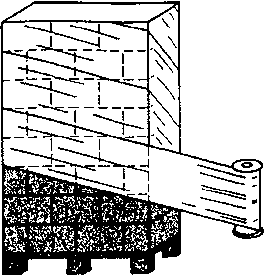
Newer methods of collating containers include shrinkwrap or stretchwrap films which hold the bottles or jars together on card trays (Figures 22 & 23).
Equipment suppliers
Bottle/cap sealers
Rajan Universal Exports (MFRS) P Limited
Raj Buildings 162
Linghi
Chetty Street
P Bag No 250
Madras 600 001
India
Tel: +91 (0)44 2534 1711
Fax: +91 (0)44 2534 2323
Narangs Corporation
25/90 Connaught Place
Below Madras Hotel
New Delhi 110 001
India
Tel: +91 (0)11 2336 3547
Fax:+91 (0)11 2374 6705
M.M.M.Buxabhoy & Co. 140 Sarang Street
1st.Floor
Near Crawford Market
Mumbai
India
Telephone: +91 (0)22 2344 2902
Fax: +91 (0)22 2345 2532
Manual heat sealing machine used for sealing
plugs of plastic containers, bottles, jars
and jerry cans.
Liquid Filling Equipment
Geeta Food Engineering Plot No. C-7/1 TTC Area
Pawana MIDC
Thane Belapur Road
Behind Savita Chemicals Ltd.
Navi Mumbai - 400 705
India
Tel: +91 (0)22 2782 6626/766 2098
Fax: +91 (0)22 2782 6337
Bottle Washing and Filling Machine
Autopack Machines PVT LTD 101-C, Poonam Chambers
'A' Wing, 1st Floor
Dr. Annie Besant Road
Worli
Mumbai - 400 018
India
Tel: +91 (0)22 2493 4406/2497 4800/2492 4806
Fax: +91 (0)22 2496 4926
Pneumatic liquid filler suitable for filling any food products in liquid form into bottles. No electric power is required. Up to 20 fills/minute
Dairy Udyog C-230, Ghatkopar Industrial Estate
L.B.S. Marg
Ghatkopar (West)
Bombay - 400 086
India
Tel: +91 (0)22 2517 1636 / 517 1960
Fax: +91 (0)22 2517 0878
Sealing and Filling Machines: Semi automatic machine for packing liquids such as milk, oil, ghee etc. in pillow packs. Capacity: 300 pack/hour Power: Electric
Mark Industries PVT Ltd 348/1 Dilu Road
Mokbazar
Dhaka-1000
Bangladesh
Tel: +880 2 9331778 / 835629 / 835578
Fax: +880 2 841049
Manually powered Juice filling machine.
Bottle washing Equipment
Gardners Corporation 6 Doctors Lane
Near Gole Market
PO Box 299
New Delhi - 110001
India
Tel: +91 (0)11 2334 4287 / 336 3640
Fax: +91 (0)11 2371 7179
Bottle Washing Machine. This machine has 2 brushes and a drive motor.
Power: Electric.
Dairy Udyog
Ghatkopar Industrial Estate
LBS Marge, Ghatkopar,
Mumbai 400 086, India
Tel: +91 (0)22 2517 1636/ 2517 1960
Fax: +91 (0)22 2517 0878
Bottle brushes
Labelling machines
Rank and Company A-95/3
Wazirpur Industrial Estate
Delhi - 110 052
India
Telephone: +91 (0)11 2745 6101/2/3/4
Fax: +91 (0)11 2723 4126 / 2743 3905
Label Gumming Machine Used for pasting gum on labels.
Narangs Corporation
25/90 Connaught Place
Below Madras Hotel
New Delhi 110 001
India
Tel: 91 (0)11 2336 3547
Fax: 91 (0)11 2374 6705
Labelling Gumming Machines
This hand operated label gumming machine is suitable for labels of up to 15cm width. Power: Manual
Bhavani Sales Corporation Plot No.2/1
Phase II
GIDC
Vatva
Ahmedabad - 382 445
India
Tel: +91 (0) 79 2583 1346 / 2589 3253
Fax: +91 (0)79 2583 5885 / 2583 1346
Semi automatic labelling machine suitable for all types of round containers, jars, tins, cans and bottles. Capacity: 30-40 containers/minute
Acknowledgements
Some of the diagrams and text used in this technical brief come from a variety of sources. We would there like to thank the following for allowing us to reproduce: TOOL, ILO, and PRODEC.
Further reading
- Bottle and Jar Cooling Systems, Practical Action Technical Brief
- Bottle washing and Steam Sterilising, Practical Action Technical Brief
- Packaging Materials for Food, Practical Action Technical Brief
- Small-scale Food Processing: A guide to appropriate equipment Edited by Peter Fellows & Ann Hampton, ITDG Publishing/ CTA 1992
- Appropriate Food Packaging by Peter Fellows & Barry Axtell, ILO/TOOL 1993
- Packaging, Food Cycle Technology Source Book, ITDG Publishing/ UNIFEM 1996
- Small-scale Food Processing: A Directory of Equipment and Methods by Sue Azam-Ali ITDG Publishing, 2003
References
This Howtopedia entry was derived from the Practical Action Technical Brief Packaging Foods in Glass - Technical Brief.
To look at the original document follow this link: http://www.practicalaction.org/?id=technical_briefs_food_processing
Useful addresses
Practical Action
The Schumacher Centre for Technology & Development, Bourton on Dunsmore, RUGBY, CV23 9QZ, United Kingdom.
Tel.: +44 (0) 1926 634400, Fax: +44 (0) 1926 634401
e-mail:practicalaction@practicalaction.org.uk
web:www.practicalaction.org

Categories
- Small Business
- Products
- Construction
- Transportation
- Waste
- Recycling
- Principles
- Medium
- More than 5 Persons
- Global Technology
- Urban Environment
- Glass
- Howtopedia requested images
- Howtopedia requested drawings
- Requested definitions
- Requested translation to Spanish
- Requested translation to French
- Between 50 and 200 US$
- Food Processing
- Health
- Small Industry
- Practical Action Update
