Difference between revisions of "How to Make Candles"
| (One intermediate revision by the same user not shown) | |||
| Line 243: | Line 243: | ||
[[Category:Requested translation to Spanish]] | [[Category:Requested translation to Spanish]] | ||
| − | + | [[fr:Comment fabriquer des bougies]] | |
Latest revision as of 17:50, 13 December 2010
Contents
Candlemaking
Introduction
Materials
The fuel
It is important to select a fuel which is both appropriate for a particular situation and which produces a good candle (that is one which burns steadily, lasts for a long time, produces very little smoke and gives a good quality light). Many modern candles are made from a mixture of paraffin wax and stearine. Although this may be suitable in many situations, there are other substances which can also be used as fuel for candlemaking some of which are mentioned below.
Paraffin wax
Paraffin wax is a petrochemical raw material that has been used in candlemaking during the 150 years of the global petroleum industry. Fully refined waxes are translucent to opaque in appearance, colour, odourless, tasteless and hard or firm in consistency at room temperature. They have a melting-point range of 46° to 68°C. Those waxes which melt at around 58°C are ideal for candlemaking in temperate climates, although wax with a higher melting point is required for use in hotter climates. Paraffin wax may be used to make candles by any of the following processes de- scribed.
Stearine
Stearine is a component of many animal and vegetable fats and has become an important material in candle making. It is important as a hardening agent for paraffin wax owing to its good temperature stability.
It helps to overcome the problem of 'bending' which is sometimes experienced with paraffin wax candles in hotter climates, and also helps in the release of candles from moulds.
The amount of stearine to be used varies, depending on the quality of candle required.
Although the average amount is about 10 per cent, up to 50 per cent may be required for candles in warmer climates.
Beeswax
Beeswax, a relatively soft and sticky substance with a melting point of about 64°C, is obtained by melting the honeycomb of the bee in hot water, straining it and allowing it to cool. Beeswax is an excellent wax, but it will cost 10 time the price of soyawax.
At this stage it is a brownish-yellow colour and is usually bleached before being used in candle making.
Beeswax has been used in the manufacture of candles since the earliest times, and is an excellent material with which to make dipped and poured candles. However, it is unsuitable for use in the manufacture of moulded candles, since it undergoes considerable con- traction on cooling and has a tendency to stick to the mould.
Beeswax is also a very expensive commodity, and candles made from it are considered a luxury. However, when added to paraffin wax in quantities of about 5 per cent it improves both the burning time and appearance of the candles.
Vegetable waxes
Many plants, shrubs and trees yield waxes which can be extracted, purified as necessary and used in the manufacture of candles. In some cases, it may be possible to use these waxes as the main source of fuel for the candle, in others it may only be possible to use them in small quantities to improve the qualities of another wax. Soyawax is now the most widely used vegetable wax.
Soybean Wax
How to Get Wax from a Bean? A 60 pound bushel is the traditional farm measure. When soybeans are processed they are crushed and pressed to separate the soybean meal from the oil. In each 60 pound bushel, 49 pounds of soymeal and 11 pounds of oil are produced. The 49 pounds of soymeal is where the protein content of the soybean is, and soymeal is processed into animal feeds and foods for human consumption such as soy milk, tofu, texturized soy protein ( a meat substitute such as "veggie-burgers). Soyawax utilizes the 11 pounds of soybean oil out of each 60 pound bushel and make it into soybean wax by a process of partial hydrogenation of the soybean oil and addition of natural ingredients. (which ingredients?) (for exemple Soyawax: this wax is 100% edible grade vegetable oil: 85% is soybean oil. The other 15% content are vegetable glycerides. Soyawax is 100% from renewable plant/agricultural sources. )
The wick
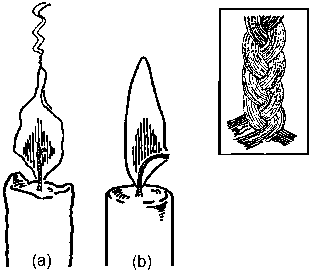
The type of wick originally used in candlemaking was made of bleached twisted cotton yarn (Figure 1 a). On burning, it stood upright in the centre of the flame (which is cool) and was therefore unable to burn away cleanly. The result was a very smoky flame, providing only dim light and requiring frequent snuffing. The wick used in modern candles is made of plaited or braided cotton (Figure 1 insert), resulting in a uniform wick which curls as it burns. The curling brings the end of the wick into the hottest part of the flame where it is able to burn away cleanly and thus provides a bright flame, with no need for snuffing (Figure 1 b).
When the wick is lit, the flame should radiate sufficient heat to melt a small pool of wax at the top of the candle. The liquid wax is then drawn up the wick by capillary action into the flame where it is vaporised and burnt. The size of the wick is important and should be related to the diameter of the candle and to the mixture of waxes used as fuel.
If the wick used is too thick, it causes a large flame to form, which generates so much heat that it prevents the formation of the pool of molten fuel by melting the outer edge of the candle and allowing the wax to run down the sides. On the other hand, if the wick used is top thin, the flame is unable to generate enough heat to form a proper reservoir of molten fuel. The result is that the flame burns a hole down the centre of the candle until it is extinguished through lack of oxygen. As a general rule, candles with large diameters require thicker wicks than those with small diameters.
Substances such as beeswax which are viscous when liquid require a thicker wick than substances with a lower viscosity. In general, the more viscous the liquid fuel, the thicker the wick required. In countries with established candlemaking industries, wicks may be obtained directly from manufacturers, or, in smaller quantities, from craft suppliers. It is also possible to make wicks by hand, using simple equipment.
Melting the fuel
In the manufacture of candles it is essential that the fuel being used is heated to the temperature required, and maintained at that temperature for the duration of manufacture. The equipment used for heating will depend on the source of heat available.
The most important aspect to be considered in the design and use of equipment is safety. It is important that the wax is not overheated; heating above 150°C can result in unpleasant and dangerous fumes being given off. It is also very important to prevent wax from being spilt on to a naked flame as this would present a very serious fire hazard. These situations can be avoided, for example, by the use of a water jacket in which the fuel is not heated directly but absorbs heat from the water surrounding it. This in itself may become a safety hazard if the water is allowed to boil away, so precautions must be taken to prevent this from happening.
Heating equipment
Electricity
Electricity is ideal as a source of heat if it is available, as it is easily controlled. Heating elements may be bolted to the bottom of a tank, or electrically-heated water jackets may be used.
Gas
Tanks or pots may be placed on gas heaters provided that the bottom is thick enough to prevent the wax from burning. The use of a gas- heated water jacket may well be preferable, however, to avoid the danger of spilling wax onto a naked flame.
Solid fuel
Solid fuel should only be used where no other source of fuel is available. Great care must be taken to prevent wax from being spilt onto naked flames. Again, the best solution may well be that of a water jacket, this time heated by solid fuel. It may also be possible to use either a specially constructed or a standard type of oven.
In all cases, containers to be used for melting the wax should be leakproof and made from steel, aluminium, or iron (except in the case of beeswax, where iron equipment is not suitable). Copper and brass should be avoided as they cause oxidisation.
Methods of measuring and controlling temperature
Although it is possible to make candles without any means of determining the temperature of the fuel, it is not advisable to do so as the likely result is the production of a high percentage of poor- quality candles.
If it is available, a thermostat is a very good way of controlling the temperature of the wax, provided that it has been accurately calibrated. The use of a thermostat in conjunction with some form of electrical heating equipment allows the wax to be heated to a specified temperature and maintained at that temperature without the need for frequent manual checking and adjustment.
A thermometer is also a good way of measuring temperature although, in general, monitoring and adjustment have to be carried out manually. It is therefore important that, when using this method, the temperature of the wax mixture is checked frequently and adjusted as necessary. One of the advantages of thermometers is that they are relatively cheap and there are several types which may be used.
Thermometers for use in candlemaking (such as a mercury-in-glass thermometer or a sugar thermometer) should have a range of DoC to 1 DDoC. It is important that a thermometer is not heated beyond its upper limit as this is likely to make it very inaccurate in the future.
There are three methods of candlemaking which are particularly suitable for small-scale manufacture, namely dipping, pouring, and moulding (casting).
The methods described below allow candles of many different shapes and sizes to be produced, so that it is possible to make both utilitarian and decorative candles. The selection of a particular process will be dependent on the equipment and space available, and on the size, shape, and quantity of candles to be produced, as well as the raw materials to be used.
Dipping
Dipping is the simplest method of making candles. It consists of immersing the wick in molten wax and withdrawing it, so that it picks up wax as it emerges. The wax is allowed to cool and the process is repeated until the required candle thickness has been built up. The method enables several hundred candles to be produced in a day using relatively simple equipment. The length and diameter of candles produced by this method is limited only by the dimensions of the dipping can.
The equipment used for dipping can range from a stick from which the wicks are suspended to an elaborate, commercially made machine. At the very simplest level, dipping may be carried out by holding the centre of a wick in one hand and dipping it repeatedly into molten wax so that a pair of candles is produced (Figure 2). Although this approach results in a very low rate of production, it is the principle on which all dipping machinery is based.
In the dipping process, a number of wicks are suspended and repeatedly dipped into molten wax, successive layers being built up to form the finished candle. Excess wax drains off, but some remains at the lower end which is therefore thicker. Although it is possible to produce uniform candles using this method by discarding the lower 10cm or so, this is wasteful in terms of heat applied and wick used unless the tapered section may also be used as a candle. It may therefore be preferable to use a different technique (such as moulding) if it is necessary to produce only uniform candles.
In order to obtain a well-formed candle, the wick should be submerged in the molten wax and withdrawn as smoothly as possible so that even layers with no drips or other surface imperfections are built up. The use of a counterweight is recommended wherever possible.
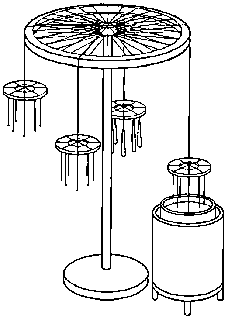
Figure 3 illustrates a continuous dipping process for four or more wick holders suspended from a wheel. Using this method, the wheel is rotated after each dip to enable a fresh set of wicks to be presented for dipping.
Priming the wicks
When the wax has been heated to the correct temperature (eg. 75°C for a blend of 70 per cent paraffin wax and 30 per cent beeswax) the first group of wicks should be lowered into it. They should be left to soak for about three minutes to allow air and moisture to escape. This process is known as priming and should be done with each new group of wicks. The primed wicks should be drawn through the fingers as they cool, so that any lumps are removed. This will help to ensure that the finished candles are smooth and uniform.
When all the wicks have been primed, the dipping proper begins. Each dip should be carried out slowly and smoothly, leaving the wicks immersed in the wax for about five seconds. The group of wicks are then dipped in turn so that by the time all the wicks have been dipped once, the first group of wicks is ready to be dipped for a second time.
In practice, the conditions should be such as to produce the best appearance for the least number of dips per candle. Various factors affect this:
• Increasing the time between dips reduces the number of dips needed.
• Increasing the temperature of the wax increases the number of dips needed.
• Higher air temperature increases the time needed between dips. When the required thickness has been built up, the candles are removed, trimmed at their lower ends and allowed to cool.
The finished candles may be rolled on a warm glass, metal, or stone surface if a very smooth surface is required.
Pouring
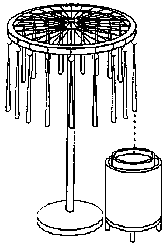
The equipment used in the pouring process (see Figure 4) is very simple. It consists of an old bicycle wheel in a horizontal plane supported by a vertical shaft, the length of which is determined by a suitable working position. The bottom end of the shaft should be located in a heavy base-plate, to ensure that the apparatus is safe for working. The wheel must be able to rotate freely. Small metal hooks made from thin wire are fixed to the outer rim of the wheel, from which the candle wicks are suspended. The wicks are weighted at their lower ends. A heated container, similar to that used for dipping, is positioned so that the outer rim of the wheel is above the centre of the container. A small ladle is required for pouring the heated wax over the wick.
The wax is heated to the correct temperature and is poured, using the ladle, down each wick in turn. Any wax which drips from the wicks goes back into the melter. During pouring, the wick should be twisted slowly to aid the formation of an even coating of wax. After each pouring, the wheel is turned until the next wick is positioned above the wax container and the process is repeated.
It is only possible for a certain amount of wax to be added at each pouring. The candle must therefore be built up from many thin layers; the process being repeated until the required thickness has been built up. It is important that the conditions are right for pouring: if the candles are too warm and the wax is also too hot, one pouring will tend to melt the previous layer. The temperature of the wax should therefore be adjusted to take into account the speed of working round the wheel, the workshop temperature and the composition of the wax mixture.
During the pouring, the candles may sway a little and stick together. If this happens they can be separated gently with a knife, or by tapping. When a sufficient thickness of wax has been built up, the candles are removed from the wheel and the weights cut off. They can then be rolled smooth on a warm glass or metal surface or stone slab after which they should be hung by their wicks for twenty-four hours to cool.
Moulding
The moulding (or casting) technique involves filling a mould (in which a wick has been positioned) with molten wax, allowing the wax to cool and then removing the completed candle from the mould.
Moulding (or casting) is most suitable for the following conditions:
• for a household which is making candles for its own use, so that the number required is very small;
• for candles which are decorative rather than strictly utilitarian (in which many techniques of colouring, texturing and the production of special shapes are used);
• for candles which are over 4cm in diameter; and in the mass production of plain candles, in which case special machines are used.
Thus moulding may not be suitable for use on a small industry basis if plain candles are to be produced. The technical reasons for this are that the moulds must be well designed and accurately made if they are to be reliable, that continual attention during cooling is needed for topping up as the wax contracts and that for an output comparable to some of the other candlemaking techniques, a large number of moulds is required. The method can, however, produce highly finished and decorative candles.
In general, candle moulds come in two varieties; rigid and flexible.
Rigid moulds are made from materials such as metal, glass, and plastic, whereas flexible moulds are made from rubber or PVC. Flexible moulds can be used to produce irregular-shaped candles, so they can produce utilitarian or decorative candles.
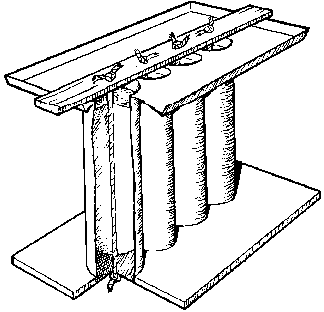
The technique itself is very simple; it involves suspending a wick in a mould and then filling the cavity of the mould with molten wax. When the wax has cooled and set, the finished candle can be removed and will be an exact replica of the internal shape of the mould.
It is important that the wick is positioned in the centre of the mould and held taut, for example by tying it to a rod at the top of the mould. Moulds should be sealed at the bottom using either mould sealant (available from craft shops/candlemaking suppliers) or an equivalent substance, such as clay, which will prevent wax from seeping out of the mould. Wicks for use with rigid moulds should be primed first, as described on page 19. Primed wicks aid the removal of mould sealant from the finished candle and ensure that air is excluded from the wick.
A hard paraffin wax (that is, one with a melting point of about 60°C to 68°C) is ideal for moulding, as it is less likely to adhere to the sides of the mould than a softer (lower melting point) wax. A relatively high proportion of stearic acid may be added to improve both the hardness of the candle and its shrinkage when cooling; thus aiding the removal of the candle from the mould.
Decorative candles
It is possible to make decorative candles from candles produced using the techniques outlined in this Brief. Some methods require that the candle first be overdipped with coloured wax, where other methods can be used with ordinary white candles. In all cases, it is best to plan the design (on paper for example) before starting to work with the candle.
Dyeing
One of the most common ways of producing a decorative candle is to use colour. It is possible to make coloured candles in two ways:
• by dyeing the wax before making the candles, so that 'solid' coloured candles are produced; and
• by overdipping plain white candles with layers of brightly coloured wax. The addition of a small amount of fat to the paraffin wax (for example stearine beeswax) is necessary to obtain bright colours.
It is possible to use either dyes or pigments (or, in certain situations, a combination of both) to colour candle wax. The amount of dyestuff required per kilogram of wax should be recommended by the supplier. As the amount of colouring material required to give a particular shade is dependent on the composition of the wax mixture, however, this figure should be used as a guide only, and different proportions of dyestuff be used until the required shade is obtained. In general, a much greater proportion of dyestuff is required for over- dipping than for producing 'solid' coloured candles.
Painting
This technique involves the use of a very strongly dyed wax to paint a design on to the surface of a candle with a paintbrush.
Related Articles
How to make Candles using Soybean Wax
References and further reading
This Howtopedia entry was derived from the Practical Action Technical Brief Candelmaking.
To look at the original document follow this link: http://www.practicalaction.org/?id=technical_briefs_manufacturing
Traditional Candlemaking: Simple Methods of Manufacturing by Deborah Millington, IT Publications, 1993
This Technical Brief has been adapted from Traditional Candlemaking: Simple methods of manufacture by Deborah Millington published by IT Publications, London, 1992. Adapted by Rod Shaw, WEDC.
Originally published in the Appropriate Technology Volume 19. Number 4 March 1993. For more information about Appropriate Technology contact:
Research Information Ltd.
222 Maylands Avenue
Hemel Hempstead, Herts.
HP2 7TD
United Kingdom
Tel: +44 (0)20 8328 2470
Fax: +44 (0)1442 259395
Website: http://www.researchinformation.co.uk
http://www.apprpriatechnology.com
Useful addresses
Practical Action
The Schumacher Centre for Technology & Development, Bourton on Dunsmore, RUGBY, CV23 9QZ, United Kingdom.
Tel.: +44 (0) 1926 634400, Fax: +44 (0) 1926 634401
e-mail:practicalaction@practicalaction.org.uk
web:www.practicalaction.org

www.soyawax.com


