How to Harvest Run Off Rainwater
Contents
- 1 Run Off Rainwater Harvesting the Path to Enhanced Livelihoods - Technical Brief
- 1.1 Short Description
- 1.2 Introduction
- 1.3 Rainwater for agriculture
- 1.4 Step-by-step procedure of run off rainwater harvesting
- 1.4.1 Selecting a location for the construction of a rainwater harvesting tank
- 1.4.2 Things to be bare in mind
- 1.4.3 Constructing the rainwater harvesting tank
- 1.4.4 Mud filters
- 1.4.5 Best practices of operation and maintenance
- 1.4.6 Estimation of costs for a run off tank with 10000 litre capacity
- 1.4.7 How to use water efficiently for irrigation
- 1.5 References and further reading
- 1.6 Useful addresses
- 1.7 Related articles
- 1.8 Categories
Run Off Rainwater Harvesting the Path to Enhanced Livelihoods - Technical Brief
Short Description
- Problem:
- Idea:
- Difficulty:
- Price Range:
- Material Needeed:
- Geographic Area:
- Competencies:
- How Many people?
- How Long does it take?
Introduction
Even though agriculture is an integral part of rural livelihoods of communities all over the world, there are many instances when farmers in water scarce areas are unable to succeed in their agricultural ventures due to the unavailability of water at correct time in required quantities.
The aim of this Technical Brief is to create awareness of a successful method of "run off rain water harvesting" which can be effectively used by resource poor farming households, to overcome the hardships of nature. This method has been developed over a long period of time by various institutions experts and community members, and people working with men and women who live in drought situations.
Rainwater for agriculture
Rain fed agriculture is not a novel idea to drought affected areas. As a counter measure to the unpredictability of rain, communities developed various agricultural practices to suit 'low water intensive' agriculture. Rainwater harvesting is one such method. In Sri Lanka, the first evidences of rainwater harvesting can be traced back at least 2500 years to ancient civilizations. The use of rainwater harvesting for agriculture has become common as a result of the intermittent nature of rains in many Asian counties and is widely practiced in areas where there is a failure of the seasonal rains, or drier climatic conditions persist for most part of the year. Rainwater harvesting is a viable option for areas with two or three scattered rainy seasons. In Sri Lanka, even the driest area would get an average annual rainfall of 1250mm. In Sri Lanka, rain occurs only during four months of the year and during the remaining eight months the rainfall is minimal. Therefore, rainwater harvesting technology helps to store water in rainy seasons, for usage, during the drought season.
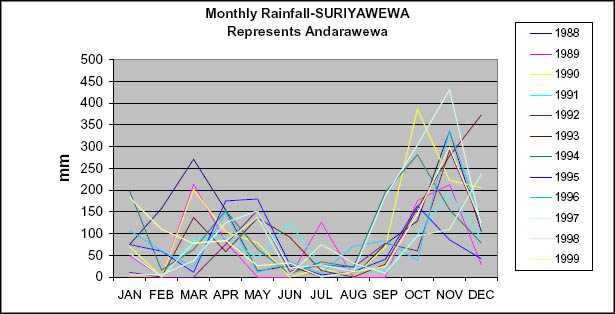
Figure 1: Rainfall pattern in Suriyawewa - Hambantota District
As an example, the rain fall pattern in Suriyawewa divisional secretariat, in Hambantota district is shown in figure 1, which clearly highlights that rain is mainly received during the four months; March - April and October - November.
|
"Not even a single raindrop should be allowed to flow into the sea without having made use of it for the benefit of the people" - King Parakramabahu the Great (1153-1186AD), Pollonnaruwa Era |
Sri Lankan ancestors were successful in harvesting rainwater through a cascade system of massive tanks. The following data (table 1) indicates the scale of ancient irrigation tanks in which rainwater harvesting was an integral part of their irrigation management.
Table 1: Major constructed tanks in the Dry Zone Sri Lanka tanks
|
Name of the Tank |
|
|
Parakrama Samudraya |
|
|
Kalawewa |
|
|
Minneriya wewa |
|
|
Kantale wewa |
|
|
Nuwara Wewa |
|
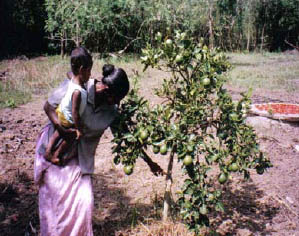
These tanks were built to irrigate vast areas and support a large population. The rainwater tanks described in this brief are on a domestic scale, that can store about 10,000 litres of rainwater at a time, and sufficient to irrigate a quarter or half an acre of land, to successfully grow 35-40 perennial crops such as - 'Jak' (Artocarpus nobilis), coconut (Cocos nucifera), pomegranate (Punica granatum), orange (Citrus spp) and mango (Mangifera indica).
What is rainwater harvesting?
Managing, controlling and making use of rainwater in-situ or within the vicinity of rainfall is termed as rainwater harvesting.
Run off rainwater harvesting
In this method of collecting rainwater for irrigation, water flowing along the ground during the rains will be collected to a tank below the surface of the ground. The tank is constructed using bricks, which are coated with cement. During storage, it is important to incorporate efficient and effective water conservation methods - by reducing evaporation and also by adopting efficient irrigation techniques. It is a very 'easy to adopt' technology proven with many communities in the country that if used properly can be very profitable.
Step-by-step procedure of run off rainwater harvesting
Selecting a location for the construction of a rainwater harvesting tank
- Observe the direction of the surface flow of rainwater in the land.
- Even though some believe that such tanks should be constructed in the lowest lying area of the land, this is not essentially so. Due to the seasonal patterns of rainfall and the high intensity of rains received in Sri Lanka, it is possible to fill a 12,000 litre capacity tank without much difficulty.
- The tank may be subjected to cracks due to the root zone activities (i.e. ramification), therefore, it is advisable not to construct the tank in close proximity to large trees.
- The tank should be close to the area of cultivation to ensure ease of irrigation.
- The tank should not be in close proximity to the house or to paths/roadways as it is possible for children and even negligent adults to fall in. As an additional security measure, construct a fence around the tank.
- The opening of the tank should be to the direction of the flow of rainfall. It is not advisable to obstruct patterns of natural flow of water as there is a possibility of mud and other waste getting into the tank. (The mud filters function only when the water flows directly through them).
Things to be bare in mind
- If a very strong current of water is flowing it could place the tank in jeopardy, and even break it / wash it away
- If by construction of the tank, the natural water flow is obstructed, soil erosion can occur and crops can consequently be destroyed.
Constructing the rainwater harvesting tank
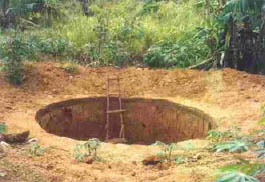
- Clear the selected land thoroughly. Flattening the land is important for ease of taking measurements.
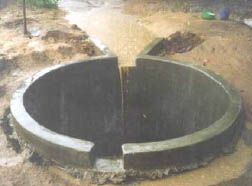
- It is advisable to construct a circular tank as it will withstand greater pressures.
- Determine the quantity of water required for irrigation purposes.
In such instances, the following factors should be considered:
a) The rainfall pattern of the area. (If the area experiences regular rainfall throughout the year, a small tank of 4000-5000 litres would suffice, whereas in particularly dry areas which experience dry spells for about 6 months of the year, it would be beneficial to store as much water as possible.)
b) The extent of land, which is proposed to be cultivated
c) The amount of investment that can be made.
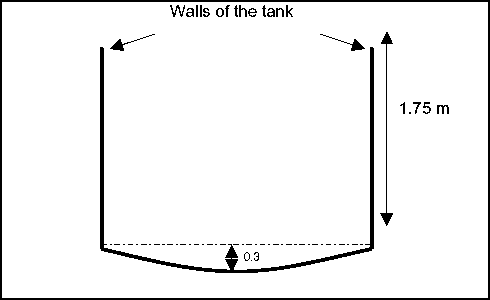
The tank should not be more than 1.75 m in depth in order to withstand the pressure of the water. Low depth makes cleaning and use of the tank easier.
The chart given below can be used as a guide to determine the radius of the tank.
Table 2: Capacity according to the radius of the tank
|
Capacity of tank (Litres) |
Radius of tank (Meters) |
|
5000 |
0.9 |
- Take a length of rope as long as the radius and tie it to a wedge. Plant the wedge at the place you want to be the centre of the tank and draw a circle.
- Now dig-out the soil within this circle.
- The tank should have a slope of about one foot from the periphery to the middle of the tank. Figure 4 will give a side view of the tank.
- After the soil has been removed, a 10 cm slab of concrete has to be laid at the bottom of the tank. The ratio of sand, cement and metal stone in the concrete mixture should be 1:2:4
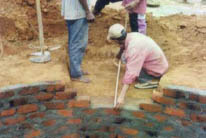
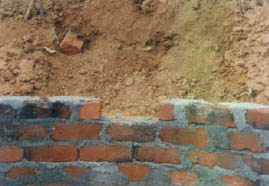
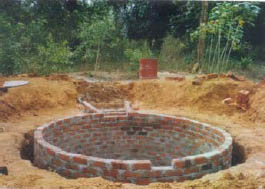
- After the slab of concrete is hardened and has completely dried, construct the walls one foot in height from the inlet with a width of one brick. It is important to use bricks with dimensions of: 5cm x 10cm x 23cm for this purpose. The cement mixture should have a ratio of cement to sand of 4:1.
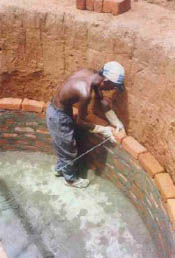
Figure 5: Wall construction of the tank on the concrete base
- As the water inlet is connected to the tank at the ground level, hence, the water inlet wall should not be raised above the surface level.
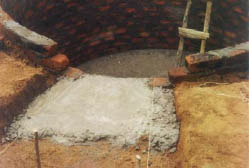
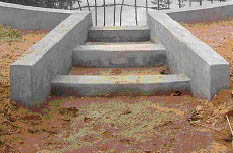
- The mud filters are attached to the water inlet. Hence the door has to be sturdy. As depicted in the picture below, a concrete slab measuring in metres 0.75m x 1m (height and length) should be laid near the door.
- When constructing the water inlet, it is necessary to face it in the direction of the natural water-flow of the garden. As the mud filters should be placed around this door, a drain should be constructed close to the inlet of 0.5 meters (near the door) and 1 metre width. The total length of this drain should be 1 metre.
Mud filters
- Various waste items are present in flowing water. Mud, sand and gravel deposits in the tank will lessen the quantity of water that can be stored in the tank. Therefore mud-filters are used as a simple method of reducing the flow of waste items into the tank.
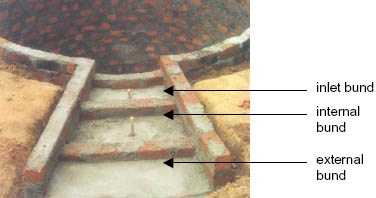
- Construct 2 brick bunds in the shape of a 'V' on either side of the drain, which is constructed near the inlet. Two other small bunds of about one brick (10 cm) high should be constructed across the 'V' shaped bunds. They should be placed in 45 cm and 85 cm from the inlet.
- From these 2 small bunds, the one closer to the tank should be a 0.75 cm lower than the inlet bund. The external bund should be constructed 0.75 cm lower than the internal bund.
By construction of bunds with a gradual rise towards the tank, it is possible to retain waste items, that flow in with the rainwater, in silting chambers located within the bunds
- In the opposite direction of the inlet-door, a 22 cm spill space (outlet) should be constructed in order to facilitate the flow of excess water. It is important to make this a 1.25 cm higher than the inlet-door.
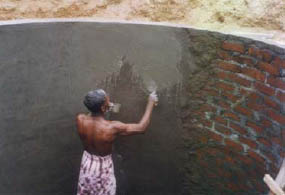
- Now plaster the tank completely with cement. In this case you should plaster the outside of the tank about 15 cm above the ground level.
- You would have observed an empty space of several inches, which has been left around the tank during the construction, to facilitate the process of construction. This empty space should be filled tightly with sand. Sand is used for the filling of this space as it can be packed tightly and is not easily subjected to decomposition. In the instance of repairs being needed for the tank, this sand layer will allow access to the tank.
- If maintained properly, it will be possible to use the rainwater-harvesting tank with ease, for about 15 years.
Best practices of operation and maintenance
- When the water in the tank becomes empty remove all soil deposits and other waste products from the bottom of the tank and clean it well.
- A small thatched hut and fence should be constructed around the tank to reduce the evaporation of water and for the security of children & domestic pets.
- Do not let water-plants grow in the tank as these will increase water loss through evapotranspiration.
- Still waters are breeding grounds for mosquitoes, therefore fish which prey on mosquito larvae eg. 'Korali' - Oreochromis mossambicus should be introduced into the tank.
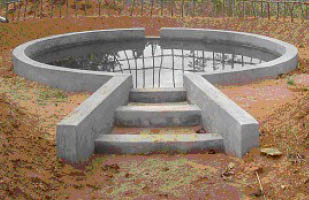
Figure 14: After the completion of the rainwater-harvesting tank
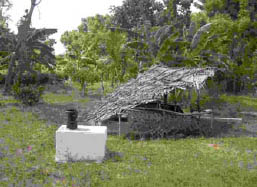
Figure 15: Thatched hut, fence protecting the rainwater harvesting tank
Estimation of costs for a run off tank with 10000 litre capacity
|
Item Description |
Cost of a unit |
No. of units |
Total cost in SL Rs. |
|
Cement |
6.50 Rs per kg |
600 kg |
3900/- |
|
Water proof cement |
80 Rs per kg |
500 g |
40/- |
|
Bricks |
1.50 Rs |
1600 |
2400/- |
|
Sand |
1600 per m3 |
1 m3 |
1600/- |
|
Metal Stones |
3200 per m3 |
0.25 m3 |
800/- |
|
Transport |
. |
Varies |
1500.00/- generally |
|
Mason fees |
350 Rs a day |
7 days |
2450.00/- |
|
Unskilled labour |
275 Rs a day |
12 days |
3300/- |
|
Total |
15990.00/- |
1 Sri Lanka Rupee (LKR) = 0.005374 British Pound (GBP) 8Run off rainwater harvesting Practical Action
How to use water efficiently for irrigation
Pitcher irrigation is an efficient method of low cost irrigation. It can be adopted in any location. In the pitcher irrigation, unglazed clay pots are used to distribute water by seepage action through the wall of the pot. This saves over 90% of water over traditional surface irrigation systems and produces higher plants yield than any other traditional or improved irrigation practice. Around 6 - 10 litre pots are sufficient to grow most of the crops. The number of pitchers needed varies with the crop density and the type of crop.
It is important to cover the pots to minimize evaporation losses. Deep percolation losses are also minimized under this method. When planting on a slope place pitchers by the side of the plants, rather than above or below the plants, to minimise wastage.
References and further reading
Micro irrigation Practical Action Technical Brief
Small-scale irrigation by Peter Stern, ITDG Publishing 1994 ISBN 0 903031 64 7
Rainwater Harvesting: the collection of rainfall and runoff in rural areas by Pacey A, Cullis A, ITDG Publishing, 1986 ISBN 0-946688-22-2
Wisdom of traditional collection of rainwater for domestic use by Ariyabandu R D E S, Lanka Rain Water Harvesting Forum, 1998
Water Harvesting: a manual for the design and construction of water harvesting schemes for plant production by Critchley W, Siegert K, Food and Agriculture Organization of the United Nations (FAO), 1992
Practical Action South Asia
5 Lionel Edirisinghe Mawatha
Kirulapone
Colombo 5
Sri Lanka
Tel: +94 11 2829412
Fax: +94 11 2856188
Useful addresses
Practical Action
The Schumacher Centre for Technology & Development, Bourton on Dunsmore, RUGBY, CV23 9QZ, United Kingdom.
Tel.: +44 (0) 1926 634400, Fax: +44 (0) 1926 634401
e-mail:practicalaction@practicalaction.org.uk
web:www.practicalaction.org

Related articles
- How to Build an Underground Brick Dome Water Tank
- How to Build a Rainwater Tank: Sri Lankan Pumpkin Tank
- How to Harvest Rainwater
- How to Harvest Water
- How to Stock Water in Cement Water Jars
- How to Fight Soil Erosion by planting Vetiver Grass
- How to Fight Slopes Soil Erosion
- How to Stop Gullies on Eroded Slopes
- How to Build Causeways out of Dry Stone
- How to Harvest Rainwater
- How to Harvest Run Off Rainwater
- How to Start Culture in Zai Holes
- How to Recycle Rubber
- turbidity
- How to Lower Water Turbidity with a Roughing Filter
- How to Pasteurize Water with a Plastic Bottle
- How to Filter Water with a Sand Filter
Categories
- Agriculture
- Communication
- Community
- Construction
- Crisis Management
- Forest
- Ideas
- Pollution
- Prevention
- Resource Management
- Soil
- Run-Off
- Water
- Water harvesting
- Irrigation
- Global Technology
- Arid Climate
- Forest Environment
- Global
- Mediterranean Climate
- Monsoon Climate
- Montaneous Environment
- Coastal Area
- Lakes and Rivers
- Rural Environment
- Temperate Climate
- Tropical Climate
- Urban Environment
- Clay
- Vetiver
- Wood
- More than 5 Persons
- Household
- Village
- Neighbourhood
- Application
- Howtopedia requested drawings
- Howtopedia requested images
- Medium
- More than 200 US$
- Between 2 and 5 People
- Local Technology
- Requested translation to Spanish
- Requested translation to French

