How to Harvest Run Off Rainwater
Contents
- 1 Récupération d'eau de pluie, le chemin vers une amélioration des moyens de subsistance - Résumé technique
- 1.1 Courte Description
- 1.2 Introduction
- 1.3 De l'eau de pluie pour l'agriculture
- 1.4 Procédure de récupération des eaux de ruissellement étape par étape
- 1.4.1 Choisir une location pour la construction du réservoir de récupération d'eau de pluie
- 1.4.2 Things to be bare in mind
- 1.4.3 Constructing the rainwater harvesting tank
- 1.4.4 Mud filters
- 1.4.5 Best practices of operation and maintenance
- 1.4.6 Estimation of costs for a run off tank with 10000 litre capacity
- 1.4.7 How to use water efficiently for irrigation
- 1.5 References and further reading
- 1.6 Useful addresses
- 1.7 Related articles
- 1.8 Categories
Récupération d'eau de pluie, le chemin vers une amélioration des moyens de subsistance - Résumé technique
Courte Description
- Problème:
- Idée:
- Difficulté:
- Fourchette de prix:
- Matériel requis:
- Matériel requis:
- Compétences:
- Combien de personnes?
- Combien de temps?
Introduction
L'agriculture fait partie intégrante du mode de vie rural des populations dans le monde entier. Néanmoins plusieurs exemples montrent que dans les régions où l'eau vient à manquer, les agriculteurs sont incapables de mener à bien leurs activités dû à une indisponibilité d'une certaine quantité d'eau à un certain moment.
Le but de ce résumé technique est de faire connaître une méthode efficace de "récupération d'eau de pluie" qui peut être utilisé par les ménages nécessiteux en région rural. Cette méthode a été développé durant une longue période par différentes institutions d'experts et membres de communautés, ainsi que des personnes travaillant avec des populations vivant dans des conditions de sécheresse.
De l'eau de pluie pour l'agriculture
L'agriculture à l'eau de pluie n'est pas une idée novatrice pour les régions sujet à la sécheresse. Dans le cadre d'une agriculture "à basse consommation en eau", les populations ont développé différentes pratiques agricoles comme moyen de lutte contre le caractère imprévisible des pluies. La récupération d'eau de pluie est une de ces pratiques. Au Sri Lanka, les premières traces de récupération d'eau de pluie remontent à au moins 2500 ans jusqu'aux civilisations anciennes. L'utilisation d'eau de pluie dans l'agriculture est devenue courante en raison de la nature irrégulière des pluies dans de nombreux comtés d'Asie. Elle est largement pratiquée dans des régions où sévit un manque de pluies saisonnières ou des conditions de climat sec persistant une majeure partie de l'année. La récupération d'eau de pluie est une option viable pour des régions connaissant deux ou trois moussons épars. Au Sri Lanka, même la région la plus sèche possède une précipitions annuelle moyenne de 1250 mm. Au Sri Lanka, il pleut pendant quatre mois de l'année et pendant les huit mois de l'année restants, les précipitations sont minimales. Ainsi, la technologie de récupération d'eau de pluie aide à stocker l'eau des moussons pour son utilisation lors des saisons sèches.
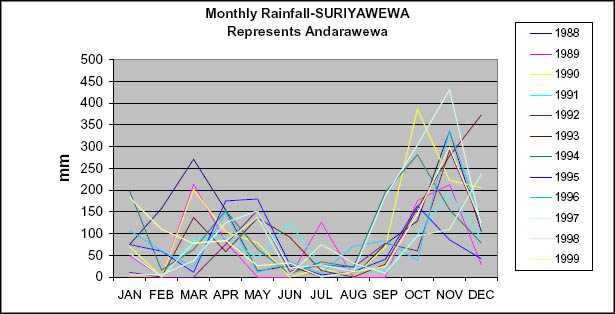
Figure 1: Tendances de précipitations au Suriyawewa - quartier Hambantota
Les tendances de précipitations du secrétariat divisionnaire de Suriyawewa dans le quartier de Hambantota est montré comme exemple en figure 1. Celle-ci souligne clairement que les pluies se produisent principalement pendant les quatre mois: Mars - Avril et Octobre - Novembre.
|
"Pas une seule goutte de pluie ne devrait être autorisé à se jeter dans la mer sans avoir été utilisé au profit des populations." - King Parakramabahu the Great (1153-1186AD), Pollonnaruwa Era |
Les ancêtres sri lankais réussissaient à récupérer l'eau de pluie avec succès grâce à un système en cascade d'énormes réservoirs. Les données suivantes (tableau 1) indiquent l'envergure des anciens réservoirs d'irrigation dans lesquelles la récupération d'eau de pluie faisait partie intégrante de leur gestion d'irrigation.
Tableau 1: Principaux réservoirs construits dans la région sèche du Sri Lanka
|
Nom du réservoir |
|
|
Parakrama Samudraya |
|
|
Kalawewa |
|
|
Minneriya wewa |
|
|
Kantale wewa |
|
|
Nuwara Wewa |
|
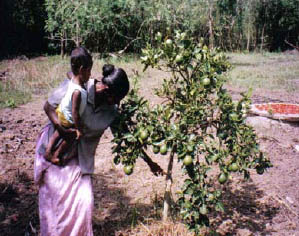
Ces réservoirs étaient construits pour irriguer de vastes superficies et ainsi subvenir aux besoins d'importantes populations. Les réservoir d'eau de pluie décrits dans ce résumé sont à échelle domestique, ils peuvent stocker environ 10 000 litres d'eau de pluie en une fois et suffire à l'irrigation d'un quart ou une moitié d'hectare. Ceci étant suffisant pour cultiver de 35 à 49 cultures pérennes tel que le 'Jak' (Artocarpus nobilis), la noix de coco (Cocos nucifera), la pomme grenade (Punica granatum), l'orange (Citrus spp) et la mangue (Mangifera indica).
Qu'est ce que la récupération d'eau de pluie?
Gérer, contrôler et utiliser l'eau de pluie in-situ ou dans les environs de précipitations est nommé "récupération d'eau de pluie".
Récupération des eaux de ruissellement
Pour cette méthode de récupération d'eau de pluie, l'eau ruisselant le long du sol durant les pluies sera récupérée dans un réservoir positionné à la surface du sol afin d'être utilisé pour l'irrigation des cultures. Le réservoir est construit en briques enduites d'une couche de ciment. Durant le stockage il est important d'incorporer des méthodes efficaces de conservation de l'eau, ceci en diminuant l'évaporation mais aussi en adoptant des techniques d'irrigation efficace. Il s'agit d'une technologie 'facile à adopter' ayant fait ses preuves dans plusieurs communautés rurales, et qui, si utilisée correctement, peut s'avérer très avantageux.
Procédure de récupération des eaux de ruissellement étape par étape
Choisir une location pour la construction du réservoir de récupération d'eau de pluie
- Observer la direction d'écoulement de l'eau de pluie sur le terrain.
- Bien que certain pensent qu'un tel réservoir doit être construit dans la zone de plus faible altitude, ceci n'est pas obligatoire. De part le caractère saisonnier des pluies au Sri Lanka ainsi que leur forte intensité, il est possible de remplir un réservoir d'une capacité de 12 000 litres sans difficultés.
- Le réservoir peut être sujet à des fissures dû à l'activité des racines (ramification), c'est pour cela qu'il est recommandé de ne pas construire le réservoir à proximité de grands arbres.
- Le réservoir doit être proche d'une zone de culture pour assurer une facilité d'irrigation.
- Le réservoir ne doit pas être placé à proximité de maisons ou chemins/routes pour éviter le risque pour un enfant ou un adulte négligeant de tomber dedans. Il est recommandé de construire une barrière de protection autour du réservoir comme mesure de sécutité additionelle.
- The opening of the tank should be to the direction of the flow of rainfall. It is not advisable to obstruct patterns of natural flow of water as there is a possibility of mud and other waste getting into the tank. (The mud filters function only when the water flows directly through them).
Things to be bare in mind
- If a very strong current of water is flowing it could place the tank in jeopardy, and even break it / wash it away
- If by construction of the tank, the natural water flow is obstructed, soil erosion can occur and crops can consequently be destroyed.
Constructing the rainwater harvesting tank
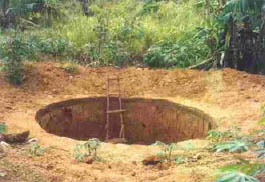
- Clear the selected land thoroughly. Flattening the land is important for ease of taking measurements.
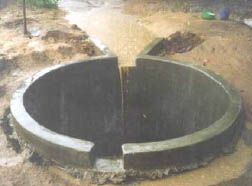
- It is advisable to construct a circular tank as it will withstand greater pressures.
- Determine the quantity of water required for irrigation purposes.
In such instances, the following factors should be considered:
a) The rainfall pattern of the area. (If the area experiences regular rainfall throughout the year, a small tank of 4000-5000 litres would suffice, whereas in particularly dry areas which experience dry spells for about 6 months of the year, it would be beneficial to store as much water as possible.)
b) The extent of land, which is proposed to be cultivated
c) The amount of investment that can be made.
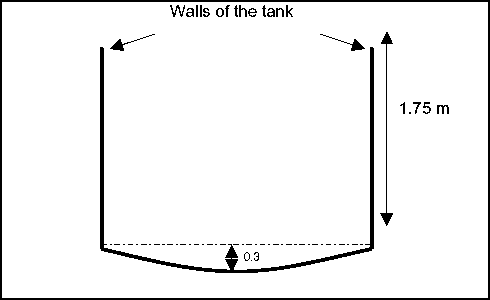
The tank should not be more than 1.75 m in depth in order to withstand the pressure of the water. Low depth makes cleaning and use of the tank easier.
The chart given below can be used as a guide to determine the radius of the tank.
Table 2: Capacity according to the radius of the tank
|
Capacity of tank (Litres) |
Radius of tank (Meters) |
|
5000 |
0.9 |
- Take a length of rope as long as the radius and tie it to a wedge. Plant the wedge at the place you want to be the centre of the tank and draw a circle.
- Now dig-out the soil within this circle.
- The tank should have a slope of about one foot from the periphery to the middle of the tank. Figure 4 will give a side view of the tank.
- After the soil has been removed, a 10 cm slab of concrete has to be laid at the bottom of the tank. The ratio of sand, cement and metal stone in the concrete mixture should be 1:2:4
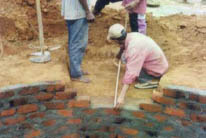
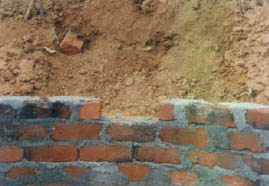
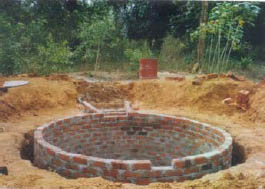
- After the slab of concrete is hardened and has completely dried, construct the walls one foot in height from the inlet with a width of one brick. It is important to use bricks with dimensions of: 5cm x 10cm x 23cm for this purpose. The cement mixture should have a ratio of cement to sand of 4:1.
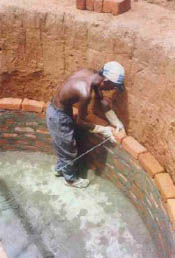
Figure 5: Wall construction of the tank on the concrete base
- As the water inlet is connected to the tank at the ground level, hence, the water inlet wall should not be raised above the surface level.
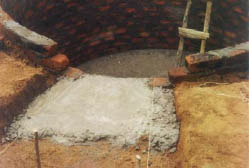
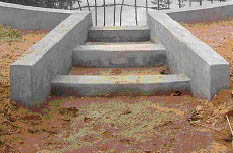
- The mud filters are attached to the water inlet. Hence the door has to be sturdy. As depicted in the picture below, a concrete slab measuring in metres 0.75m x 1m (height and length) should be laid near the door.
- When constructing the water inlet, it is necessary to face it in the direction of the natural water-flow of the garden. As the mud filters should be placed around this door, a drain should be constructed close to the inlet of 0.5 meters (near the door) and 1 metre width. The total length of this drain should be 1 metre.
Mud filters
- Various waste items are present in flowing water. Mud, sand and gravel deposits in the tank will lessen the quantity of water that can be stored in the tank. Therefore mud-filters are used as a simple method of reducing the flow of waste items into the tank.
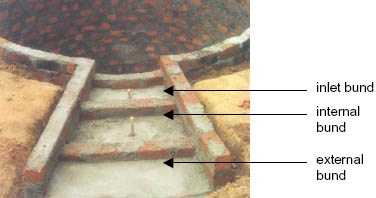
- Construct 2 brick bunds in the shape of a 'V' on either side of the drain, which is constructed near the inlet. Two other small bunds of about one brick (10 cm) high should be constructed across the 'V' shaped bunds. They should be placed in 45 cm and 85 cm from the inlet.
- From these 2 small bunds, the one closer to the tank should be a 0.75 cm lower than the inlet bund. The external bund should be constructed 0.75 cm lower than the internal bund.
By construction of bunds with a gradual rise towards the tank, it is possible to retain waste items, that flow in with the rainwater, in silting chambers located within the bunds
- In the opposite direction of the inlet-door, a 22 cm spill space (outlet) should be constructed in order to facilitate the flow of excess water. It is important to make this a 1.25 cm higher than the inlet-door.
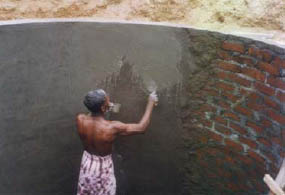
- Now plaster the tank completely with cement. In this case you should plaster the outside of the tank about 15 cm above the ground level.
- You would have observed an empty space of several inches, which has been left around the tank during the construction, to facilitate the process of construction. This empty space should be filled tightly with sand. Sand is used for the filling of this space as it can be packed tightly and is not easily subjected to decomposition. In the instance of repairs being needed for the tank, this sand layer will allow access to the tank.
- If maintained properly, it will be possible to use the rainwater-harvesting tank with ease, for about 15 years.
Best practices of operation and maintenance
- When the water in the tank becomes empty remove all soil deposits and other waste products from the bottom of the tank and clean it well.
- A small thatched hut and fence should be constructed around the tank to reduce the evaporation of water and for the security of children & domestic pets.
- Do not let water-plants grow in the tank as these will increase water loss through evapotranspiration.
- Still waters are breeding grounds for mosquitoes, therefore fish which prey on mosquito larvae eg. 'Korali' - Oreochromis mossambicus should be introduced into the tank.
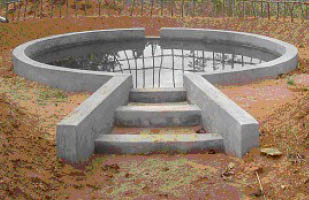
Figure 14: After the completion of the rainwater-harvesting tank
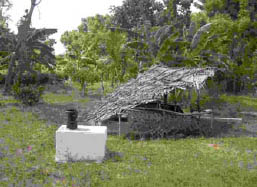
Figure 15: Thatched hut, fence protecting the rainwater harvesting tank
Estimation of costs for a run off tank with 10000 litre capacity
|
Item Description |
Cost of a unit |
No. of units |
Total cost in SL Rs. |
|
Cement |
6.50 Rs per kg |
600 kg |
3900/- |
|
Water proof cement |
80 Rs per kg |
500 g |
40/- |
|
Bricks |
1.50 Rs |
1600 |
2400/- |
|
Sand |
1600 per m3 |
1 m3 |
1600/- |
|
Metal Stones |
3200 per m3 |
0.25 m3 |
800/- |
|
Transport |
. |
Varies |
1500.00/- generally |
|
Mason fees |
350 Rs a day |
7 days |
2450.00/- |
|
Unskilled labour |
275 Rs a day |
12 days |
3300/- |
|
Total |
15990.00/- |
1 Sri Lanka Rupee (LKR) = 0.005374 British Pound (GBP) 8Run off rainwater harvesting Practical Action
How to use water efficiently for irrigation
Pitcher irrigation is an efficient method of low cost irrigation. It can be adopted in any location. In the pitcher irrigation, unglazed clay pots are used to distribute water by seepage action through the wall of the pot. This saves over 90% of water over traditional surface irrigation systems and produces higher plants yield than any other traditional or improved irrigation practice. Around 6 - 10 litre pots are sufficient to grow most of the crops. The number of pitchers needed varies with the crop density and the type of crop.
It is important to cover the pots to minimize evaporation losses. Deep percolation losses are also minimized under this method. When planting on a slope place pitchers by the side of the plants, rather than above or below the plants, to minimise wastage.
References and further reading
Micro irrigation Practical Action Technical Brief
Small-scale irrigation by Peter Stern, ITDG Publishing 1994 ISBN 0 903031 64 7
Rainwater Harvesting: the collection of rainfall and runoff in rural areas by Pacey A, Cullis A, ITDG Publishing, 1986 ISBN 0-946688-22-2
Wisdom of traditional collection of rainwater for domestic use by Ariyabandu R D E S, Lanka Rain Water Harvesting Forum, 1998
Water Harvesting: a manual for the design and construction of water harvesting schemes for plant production by Critchley W, Siegert K, Food and Agriculture Organization of the United Nations (FAO), 1992
Practical Action South Asia
5 Lionel Edirisinghe Mawatha
Kirulapone
Colombo 5
Sri Lanka
Tel: +94 11 2829412
Fax: +94 11 2856188
Useful addresses
Practical Action
The Schumacher Centre for Technology & Development, Bourton on Dunsmore, RUGBY, CV23 9QZ, United Kingdom.
Tel.: +44 (0) 1926 634400, Fax: +44 (0) 1926 634401
e-mail:practicalaction@practicalaction.org.uk
web:www.practicalaction.org

Related articles
- How to Build an Underground Brick Dome Water Tank
- How to Build a Rainwater Tank: Sri Lankan Pumpkin Tank
- How to Harvest Rainwater
- How to Harvest Water
- How to Stock Water in Cement Water Jars
- How to Fight Soil Erosion by planting Vetiver Grass
- How to Fight Slopes Soil Erosion
- How to Stop Gullies on Eroded Slopes
- How to Build Causeways out of Dry Stone
- How to Harvest Rainwater
- How to Harvest Run Off Rainwater
- How to Start Culture in Zai Holes
- How to Recycle Rubber
- turbidity
- How to Lower Water Turbidity with a Roughing Filter
- How to Pasteurize Water with a Plastic Bottle
- How to Filter Water with a Sand Filter
Categories
- Agriculture
- Communication
- Community
- Construction
- Crisis Management
- Forest
- Ideas
- Pollution
- Prevention
- Resource Management
- Soil
- Run-Off
- Water
- Water harvesting
- Irrigation
- Global Technology
- Arid Climate
- Forest Environment
- Global
- Mediterranean Climate
- Monsoon Climate
- Rainy season
- Montaneous Environment
- Coastal Area
- Lakes and Rivers
- Rural Environment
- Temperate Climate
- Tropical Climate
- Urban Environment
- Clay
- Vetiver
- Wood
- More than 5 Persons
- Household
- Village
- Neighbourhood
- Application
- Howtopedia requested drawings
- Howtopedia requested images
- Medium
- More than 200 US$
- Between 2 and 5 People
- Local Technology
- Practical Action Spanish
- Requested translation to Spanish
- Requested translation to French
- Being translated to French

