How to build a Ventilated Improved Pit Latrine
Contents
Short Description
- Problem: Privacy in defecation and Faeces storage.
- Idea: Building a hut over a hole.
- Difficulty: Easy
- Price Range: Cheap
- Material Needeed: Sand, gravel, bricks, bags of cement, wire mesh, chicken wire, water.
- Geographic Area: Global
- Competencies: Simple Mason skills.
- How Many people? 3-10
- How Long does it take?
Ventilated Improved Pit Latrine

The ventilated improved pit V.I.P latrine offers improved sanitation by eliminating flies and smell, through air circulation. The addition of a chimney draws air currents into the structure and through squat hole. Odours rise through the chimney and disperse. The structure of the toilet means that any flies attracted to the pit through the squat hole will try to escape by heading towards the strongest light source, which comes from the chimney. The flies exit is blocked by a wire mesh so the flies eventually die and fall back into the pit. The spiral structure prevents too much light entering the toilet while allowing a free flow of air.This Technical Brief by Simon Farmer is based on the Ventilated Improved Pit Latrine Construction Manual produced by UNICEF Technology Support Section, Kenya
The VIP Latrine can be built from different materials. These should be chosen according to availability and cost of materials, skills available, and soil type. If the soil of the ground is very loose, it is recommended to use lighter materials for the walls. The different materials that can be used require alternative methods of construction. In all cases, the slab is built the same and a chimney higher than the roof is constructed.
This technical brief describes the construction of a mortared brick design because it is the most popular. The main materials for this latrine are; sand, gravel, bricks, bags of cement, wire mesh, chicken wire, water.
Tools needed
Tape measure, shovels, masonry trowels, wooden floats, buckets, karias, pliers, pombo, panga or old chisel and hammer, plastic sheeting, woven plastic sugar sacks, sisal twine, large canvas sewing needles.
Sighting
Choose firm soil with good drainage. It should be made in a convenient location, at least 40 meters away from any springs, streams or rivers. Note the direction of prevailing winds. Latrines should be placed downwind of the home or school. The doorway of the VIP latrine should face the wind.
Excavation
Mark a circle in the ground using 2 sticks and a string as shown. For a family latrine, the circle should be 1.5 metres (5 feet) across, so the string should be 75 cm long between the Ventilated improved pit latrines Practical Action3 two sticks. For a school or community latrine, the diameter should be 1.8 metres across, so the string should mark a radius of 90-cm (3 feet. If the ground is quite rocky and very stable during rains, then the brick lining may be eliminated. In such cases reduce the radius (the length of the string) by 15cm. Do not make the hole too wide, you can endanger the occupants. Dig the hole 3 meters, (10 feet) deep. Be careful to keep the walls straight.

Foundation


Begin laying and mortaring courses of bricks at the bottom of the pit. Alternate vertical joints in the bricks. Do not lay bricks or plaster over the floor of the pit, and do not mortar vertical joints. Continue building up the wall of the pit. When you reach the top layer, dig out a little wider and lay the last row of bricks perpendicular, as shown. Mortar the vertical joints in this row. Most soils considerably soften during the rainy season. Due to its weight, a brick superstructure is in danger of collapsing without a strong foundation as described here. The alternative is to build a light superstructure. Very light superstructures, such as these, made from thin wattle and daub, with grass roofs, should not require such a strong foundation. Consult with a good carpenter or mason on how to assure a strong and suitable foundation that takes into account the soil type and the materials used in building. In any case, the top layer of bricks described here should be laid and the top half of the pit should be plastered with mortar.
Slab
For a 1.2m (4ft) diameter hole, make a 2.15m (7ft) diameter slab. For a 1.5m (5ft) diameter hole, make a 2.4m (8ft)diameter slab. This gives a stable 45 cm overlap to the hole. ,
Next to the latrine, dig a hole in which to cast the slab. It should have a diameter, which is 90-cm larger than the mortared latrine pit, and a depth of 7.5cm. The floor should be very smooth.
If the soil is to rocky to make a smooth floor, in the shallow hole, then build a form using lumber, or place a sheet of polythene plastic within a circle of bricks.

Carve two forms (from either wood or brick) as shown. They should be at least 7.5 cm thick. They will be used to cast the squat hole and the chimney hole in the slab. The chimney form can either be round or square.

To add strength to the floor slab, weld mesh is set into the centre of the concrete slab. You need to cut and tie together pieces of 2” weld mesh (or BRC weld mesh) to fit inside the shallow hole. Where the formers are positioned, for the chimney and squat hole, you need to remove some of the mesh to leave room for the formers to be released. Mark the ground where the forms go, and leave them in place. Then removing the wire mesh carefully and leaving the forms in place, you should be able to cast a reinforced concrete slab.

Then removing the wire mesh carefully and leaving the forms in place, you should be able to cast a reinforced concrete slab.
Mix enough concrete to fill the hole in the proportions; 1 part cement; 2 parts sand; 4 parts gravel. Add just enough water to shovel the concrete. With the squat and chimney hole form in place, pour about one third of the concrete into the smooth, shallow hole. Using the pimbo, pound down a layer 2.5 to 3cm thick. Use a clean nail to check the thickness. Insert it, then remove it and measure the cement marks.

Figure 8: The weld mesh is placed onto the concrete
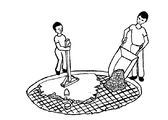
Figure 9: The mesh is covered with more concrete
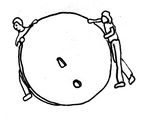
Figure 10: Moving the slab


Then lay the cut wire mesh on top of the concrete. Check to see that the hole forms are still in their proper places. Adjust if necessary so that the weld mesh wires do not quite touch the forms. Then pour a second layer of concrete 4.5 – 5cm thick, onto the reinforcement. Trowel it flat. After it has set, splash water on the concrete and cover it with plastic sheeting. Keep it damp and covered with plastic for 7 days. After the concrete has cured for 7 days, roll the slab over to the latrine pit. Mortar the bricks and lay the slab on top.

Walls
Lay down the first course of bricks very carefully. Then mortar underneath and between the bricks. Alternate the vertical joints of courses of bricks and continue up to 2 meters (6.5 ft) high. Mortar in place the flyscreen just below the foremost course of bricks on the chimney. The chimney should be two bricks higher than the top of the roof.
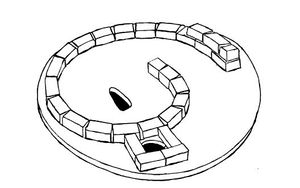
Figure 12: A spiral wall
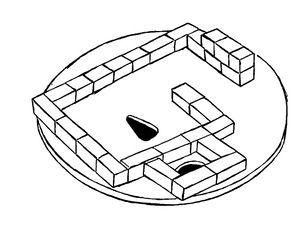
Figure 13: A square wall


If you have chosen a roof of corrugated iron, tiles or a concrete slab, then lay bricks higher toward the chimney to support the slant of the roof.
Plaster over the inside wall to encourage reflecting light. If desired, plaster the outside wall as well.
Roof
Coned Roof
Measure the top of the wall at the widest part. Draw a circle in the ground that has the same diameter. Cut 5 triangles like the one below from wire mesh. Tie them together using 16 gauge binding wire, so that they fit in the circle. Overlap the sides by 30cm. When the 5 are tied together, measure and cut the 6th triangle, including overlap. Tie it in place. Wrap 1 or 2 layers of chicken wire onto the wire mesh and bind them tightly. Turn the reinforcement upside down and sew plastic sugar sacks onto the inside. Use sisal twine, and sew stitches 10 – 15 cm in length, starting at the rim. Then place the roof reinforcement on top of the wall. Measuring very carefully mix a batch of 1:3 (cement, sand) plaster. It should not be too wet. Trowel on a layer of plaster, pushing it lightly into the chicken wire. Once the plaster has set, throw water onto the roof and then cover with plastic. Puts on a second coat of plaster the next day and trowel it smooth. It is essential that all wires be covered with plaster. Smooth the edges of the roof to make an attractive bond with the wall. Again cover with plastic once the plaster has set. Keep the plaster damp for 3 to 7 days. In the afternoon of the same day cut the twine and remove the sugar sacks from inside the roof. Throw a thin layer of 1:3 (cement, sand) plaster onto the ceiling. Cover all of the reinforcement wires. This ensures a strong and durable roof.

Concrete Slab roof
The concrete slab is made in a similar way to the slab base. You need to build up bricks higher towards the chimney to create a slant for the roof, for drainage. You may be able to use the same hole you created for the slab base, but in some cases you may need to dig a new one. The slab for the roof need only be 2.5 cm thick, but you need to allow for an overhang in the diameter. This is why you could use the base hole to construct your roof. Once you have created the hole you will need to put some other moulds in for the space where the chimney will be located. Once you have checked the measurements and everything is set out correctly, complete the slab in the same way as the base. You still need to reinforce the slab but this time only with chicken wire.

Tiled and corrugated roofs
The corrugated roof is probably the easiest to construct and will last a long time, along with the tiles. Like the concrete slab you will need to build the bricks up on the chimney side to create a slant for drainage. You will need some support pieces of wood to hold the tiles or corrugated sheet. The length of theses will vary depending on your structure, but it is again important to note you will need to allow for an overhang. When you have your beams fixed then you can begin to lay your sheet or your tiles. You must make sure that they are both fixed down correctly using suitable fixings depending on your structure. The corrugated sheets need have good overlaps between them, as do the tiles. You don’t want the roof to leak. Depending on your tiles or corrugated iron you may need to seal them as required.
Finishing the roof
Once the roof is complete you are ready for finishing For the cone roof and the concrete slab roof, keep the roof damp for about a week. Splash water on it and keep covered with plastic. When the latrine has dried you can paint if desired. For the corrugated and tiled roofs, there may be gaps between the wall and the roof, which may be filled with mortar. This is to stop the light getting in and so deterring flies from coming up the latrine Paint the inside of the wall white to make it very easy to see when inside.
Useful references
This Technical Brief by Simon Farmer is based on the Ventilated Improved Pit Latrine Construction Manual produced by UNICEF Technology Support Section, Kenya'.
To look at the original document follow this link: http://practicalaction.org/practicalanswers/
Types of toilet and their suitability Practical Action Technical Brief
Compost Toilets Practical Action Technical Brief
Training Manual for Eco-Toilet Construction Practical Practical Action Technical Brief
Shit Matters L Mehta & S Movik Practical Action Publishing 2010
Toilets That Make Compost Peter Morgan Practical Action Publishing 2008. Ecological Sanitation Esrey S Et al. Sida, Stockholm, 1998
[http://developmentbookshop.com/sustainable-sewerage.html Sustainable Sewerage - Guidelines for community schemes] Reed R.A. Practical Action Publishing, 1995,
[http://developmentbookshop.com/latrine-building.html - Latrine Building A handbook to implementing the Sanplat system] Brandberg B. Practical Action Publishing,1997
Blair Latrines Builders Instruction Manual. Laver S. Blair Research Laboratory.
Ventilated Improved Pit Latrines: Vent Pipe Design Guidelines. Ryan B.A Et al. The World Bank, Washington.1983
Ventilated Improved Pit Latrines: Recent Developments in Zimbabwe. Morgan P.R Et al. The World Bank, Washington, 1982
The Design of Ventilated Improved Pit Latrines. Duncan Mara, D. The World Bank, Washington, 1984.
Rural Water Supply and Sanitation: A Text From Zimbabwe’s Blair Research Laboratory. Morgan P. MacMillan Publishers, 1990
Useful addresses
Practical Action
The Schumacher Centre for Technology & Development, Bourton on Dunsmore, RUGBY, CV23 9QZ, United Kingdom.
Tel.: +44 (0) 1926 634400, Fax: +44 (0) 1926 634401
e-mail:practicalaction@practicalaction.org.uk
web:www.practicalaction.org
Categories
- Community
- Composting
- Health
- Hygiene
- Ideas
- Pest control
- Recycling
- Sanitation
- Soil
- Waste
- Water
- Easy to Medium
- Global Technology
- Arid Climate
- Forest Environment
- Global
- Mediterranean Climate
- Monsoon Climate
- Montaneous Environment
- Coastal Area
- Rural Environment
- Temperate Climate
- Tropical Climate
- Urban Environment
- Between 50 and 200 US$
- Compost
- Straw
- One Person and more
- Household
- Village
- Neighbourhood
- Application
- Principles
- Requested translation to Spanish
- Requested translation to French